Latham Hi-Tech Seeds

(641) 692-3258

  • Home
  • Products
    • Corn
    • Soybeans
    • Alfalfa
    • Corn Silage
    • Seed Guide
  • Performance
  • Find a Rep
  • Media
    • Blog
    • News
    • Videos
    • Podcasts
    • TECHTalk
  • About Us
    • Company History
    • Our Mission
    • Careers
    • Become a Rep
    • Sowing Seeds of Hope
  • Contact Us
  • Latham Hi‑Tech Seeds

    Western Bean Cutworm 

    WBC Purdue University (1)
    WBC Eggs Iowa State University (1)
    Credit: Iowa State University

    The Western Bean Cutworm can dramatically reduce end-of-season corn profit. The Western Bean Cutworm does not cut stalks but feeds on ears, posing as a threat to grain quality and corn yield. The cutworm moths are gray to brown with a wing span of 1 ½ inches. As a late summer insect, moths first emerge in early July and only one generation is produced each year. 

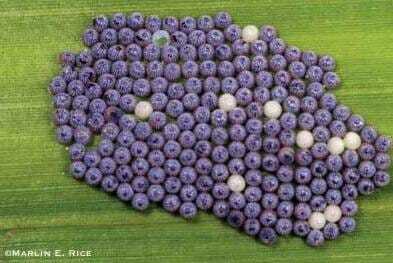
    Female moths lay eggs in whorls just ahead of the pollination stage and will lay an average of 50 eggs at a time. Eggs develop over the course of 5 to 7 days. Eggs will first be white, then become tan as they develop and will turn purple once they are close to hatching. 

    Only a small percentage of eggs typically survive, but larvae that reach full maturity can cause measurable damage to corn.  

    Scouting and Implications 

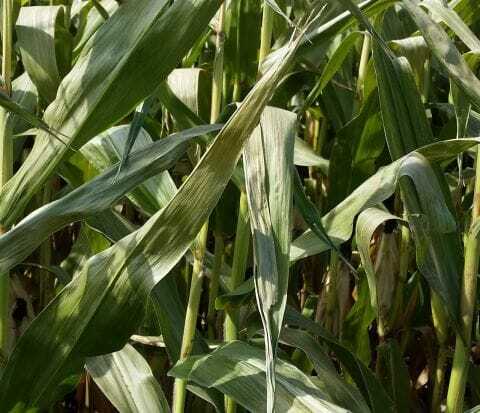
    Pheromone traps can be used to identify Western Bean Cutworm in fields. When multiple moths are caught at a high frequency, scouting for symptoms should take place. When scouting, focus on fields that are close to shedding pollen and examine 20 consecutive plants in 5 different locations.  

    WBC Purdue University (1)
    Credit: Purdue University

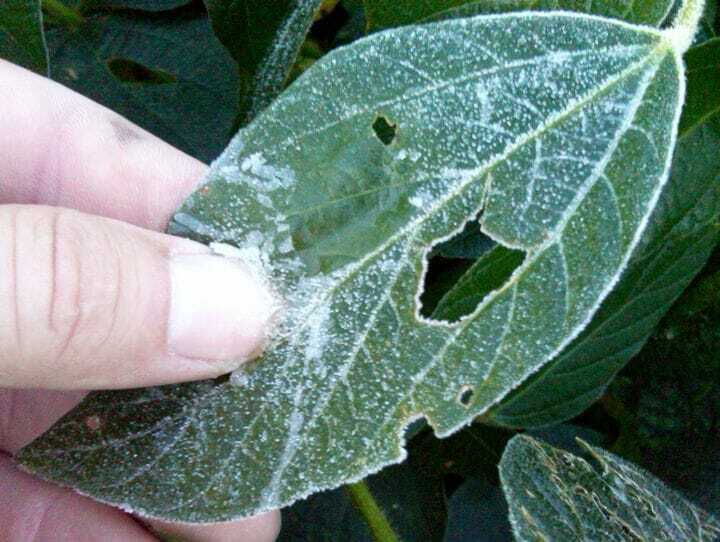
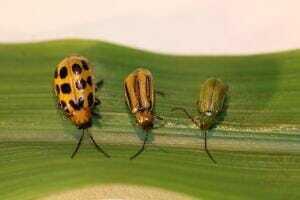
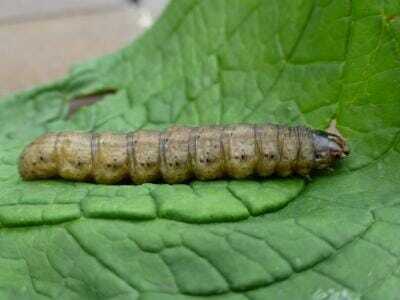
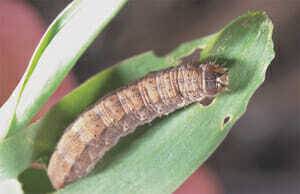
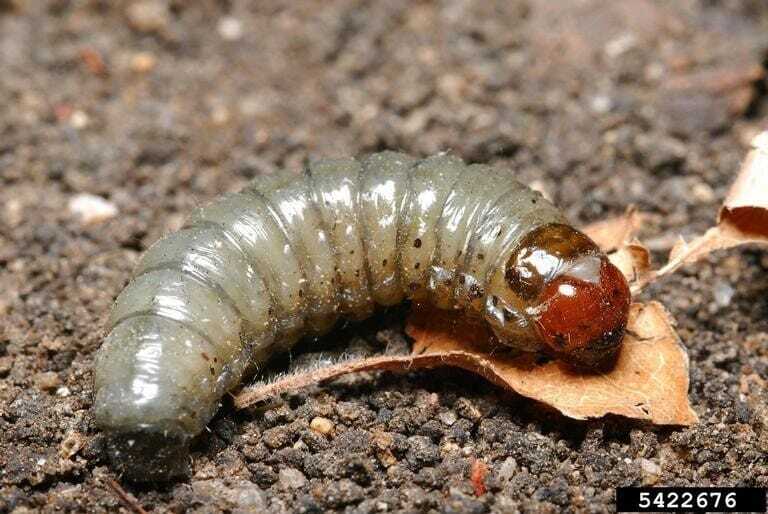
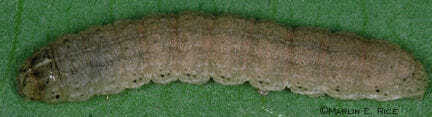
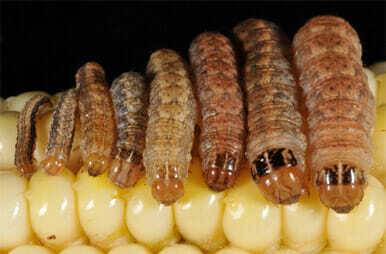
    Western Bean Cutworms feed on leaf tissue and silks as they approach the ear where most of the damage is incurred. The Western Bean Cutworm can be confused with other species of cutworm. The dark brown stripes behind their head that appear during the third instar distinguishes them from other cutworms.  

    The most mature larvae will feed on fully developed ears and can sometimes burrow into the sides of the ear. When scouting, it is important to pull back the husks to fully determine if the cutworms are present.  

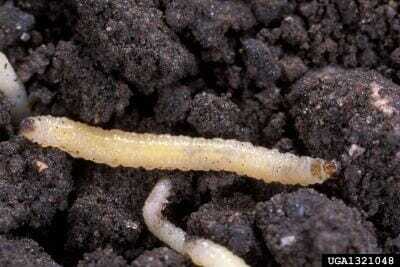
    After feeding on the ears, the larvae will drop to the soil and burrow deep underground where they overwinter. It is common for many larvae to feed on one ear at once, increasing the severity of feeding damage. Ears with multiple larvae can exhibit up to 50-60% in kernel loss.  

    An average of one larva per plant has resulted in yield loss of 4 bu/acre in Iowa and Nebraska. Aside from yield loss, damaged kernels are prone to mold growth which reduces overall grain quality.  

    Managing Western Bean Cutworm   

    Managing Western Bean Cutworm should take place close to hatching, just before pollination. Once larvae hatch and move underneath tight leaves surrounding the ear, they become difficult to exterminate. Applying a foliar insecticide is recommended when 5-8% of plants have egg masses or young larvae present but not before at least 90% of plants have emerged tassels.  

    SmartStax, Viptera, and eventually we will have Duracade traited hybrids that provide aboveground protection against Western Bean Cutworm. Though Western Bean Cutworm overwinters, there is no evidence that tillage is an effective way to combat infestation. Be sure to consult with your local Latham representative to design the most effective treatment plan.

    Latham Seeds Agronomy Team

    April 1, 2019
    Agronomics, Corn, Crop, Insects, Season, Summer
  • Latham Hi‑Tech Seeds

    Fall Frost Damage in Corn and Soybeans 

    Soybean Fall Frost – Michigan State

    Frost damage occurs in corn and soybeans when plants are exposed to freezing or below-freezing temperatures. Damage can occur to the plants above and below the soil when temperatures range from 28 to 32°F and colder. Corn and soybean plants exposed to air temperatures below 28°F are often lethal and prevent plants from undergoing full recovery from injuries. The key in assessing frost damage is waiting five days to allow for any potential growth recovery or rehabilitation to occur. 

    Soybean Fall Frost – Michigan State
    Credit: Michigan State University
    Fall Frost in Soybeans 

    Once soybeans begin maturity and already have developed pods, they are most often immune from frost injury. Soybeans placed in narrow rows can have more protection from freezing air temperatures in being covered by leaf canopies. Pods growing on the lower portion of the plant are less vulnerable to frost damage than those on the top part of the canopy. Injured soybeans exhibit elongated pods that shrink to smaller than normal sizes upon drying. Most yield loss occurs during the full seed maturity stage.  

    Soybeans damaged by frost should be dried at a temperature no higher than 130°F and may have lower oil content. Both frost damaged corn and soybeans may also have delayed dry down.  

    Fall Frost Corn – University of Minnestoa
    Credit: University of Minnesota
    Fall Frost in Corn  

    Frost-damaged corn can exhibit softened kernels prone to breakage and should be dried at temperatures below 160°F and be stored at a moisture level no higher than 14%. The storage life for frost-damaged corn will be cut in half and damaged corn should be handled separately from uninjured corn. 

    Latham Seeds Agronomy Team

    April 1, 2019
    Agronomics, Corn, Crop, Fall, Frost, Season, Soybeans, Weather
  • Latham Hi‑Tech Seeds

    Nitrogen Deficiency in Corn  

    Nitrogeon Def University of MN Extension
    Nitrogeon Def University of MN Extension
    Photo credit: University of Minnesota Extension

    Nitrogen is an essential nutrient and its depletion can lead to severe yield loss. Nitrogen deficiency can be difficult to spot as different hybrids exhibit different symptoms. Most corn plants deficient in nitrogen will exhibit pale-yellowish leaves with a spindled appearance.  

    Nitrogen is a mobile nutrient and moves to the newest leaves first, leaving the oldest leaves more susceptible to deficiency. By moving from the oldest to youngest leaves, signs of yellowing will often form a “V” pattern on the plant leaf.  

    Causes of Nitrogen Deficiency  

    Cold or saturated soils are the primary causes of nitrogen deficiency in corn. Periods of heavy rainfall increase nitrogen leaching, depleting saturated soils of the vital nutrient. Aside from soil leaching, nitrogen can be lost through denitrification – where the nutrient is converted to a gas form and lost in the atmosphere.  

    When soil conditions are dry, sandy or poorly fertilized, early-applied nitrogen fails to be absorbed by plants. Insect diseases that injure root systems can further prevent proper absorption of nitrogen and lead to deficiency.  

    Other unavoidable circumstances happen later in the growing season when the increase in plant height and density can block sunlight absorption and reduce photosynthesis. This leads corn to use nutrient reserves within the plant, which will weaken stalks.  

    Implications  

    60% of the nitrogen needed to support corn growth is built-up between V4 and pollination, making this an important time to monitor for deficiency. Scouting for nitrogen deficiency should also take place after episodes of heavy rainfall. 

    While having negative implications on yield potential and crop quality, nitrogen deficiency can also contribute to other corn disorders including tip-dieback and kernel abortion. Plants that are nitrogen deficient will cannibalize their stalks to compensate for the nutrient loss. This makes stalks more vulnerable to lodging and pinching.  

    Management Options 

    Tissue sampling can provide insight into how severe deficiency is. When testing for nitrogen deficiency in corn, gather samples from different areas of the field to compare nitrogen levels in deficient corn with healthy plants.  

    Nitrogen deficient corn should be harvested early in order to prevent additional yield loss from stalk lodging. When planning for next year’s crop, avoid planting hybrids with a history of poor nitrogen uptake. Some hybrids also demand a higher level of nitrogen during grain fill than others, so it is important to consider when planning for the next crop.  

    Be sure to consult with your local Latham representative to determine the best plan for managing nitrogen deficiency in corn.  

    Latham Seeds Agronomy Team

    April 1, 2019
    Agronomics, Corn, Crop, Fertility, Growth Stages
  • Latham Hi‑Tech Seeds

    Anthracnose Leaf Blight 

    Anthracnose Leaf Blight UMN
    Photo Credit: University of Minnesota

    Colletotrichum graminicola is a fungal pathogen that causes anthracnose leaf blight. Anthracnose leaf blight is a foliar disease that appears in the early and late stages of growth in corn plants. The fungus survives in infected corn residue that remains in the field over the winter. The disease creates elongated lesions with a dried, brown appearance across the length of the leaf blade and is bordered by a darker reddish-brown color.   

    In the earliest part of the season, leaf blight will impact the lower leaves of the plant and expand toward the top of the plant by late season. The upper part of the plant will begin to exhibit early senescence while the lowest part of the corn plant will remain green and healthy.  This is a characteristic of the Top Dieback part of this disease.   

    Disease Causes 

    Anthracnose leaf blight develops predominately from the infected residue left behind in the field. No-till, reduced till and corn on corn rotations can increase the likelihood of the disease to emerge. Though no-till and reduced-till methods are critical for preventing erosion and other corn disorders, it can lead to the accumulation of corn debris that is conducive for housing the fungal pathogen.   

    The fungus thrives in a warm and wet environment. Moisture from rainfall will often create black specks that appear across the lesions. Wind can also act as a transportation method for the fungus as spores can travel by air or water.  

    Implications and Treatment 

    The disease will infect at the seedling stage, causing foliar damage, and end at the growing season, causing stalk rot. Although anthracnose leaf blight has the potential to occur later in the growing season, early signs of the infection do not guarantee that it will resurface closer to harvest. Iowa State University researchers state that because of the early-season nature of the leaf blight, impacts on yield are rarely demonstrated. The late season stalk rot phase of the disease tends to be more detrimental on yield and harvestability. 

    Crop rotation and the use of resistant hybrids are the best ways to combat leaf blight. Fungicides can keep anthracnose leaf blight in control, but it likely will not be effective for combatting the stalk rot phase. Further, corn hybrids that provide resistance against the earliest stages of leaf blight are not often effective for preventing the onset of late-season stalk rot.  

    If tillage is used, methods that bury infected corn residue can prevent leaf blight from emerging again during the next season. Crop rotation has also been deemed as an effective way to prevent the continued onset of anthracnose leaf blight. For corn that has perpetually been impacted by leaf blight, two-year rotations away from corn are also advised.  

    Latham Seeds Agronomy Team

    April 1, 2019
    Agronomics, Corn, Crop, Disease
  • Latham Hi‑Tech Seeds

    Imbibitional Chilling

    James 1
    Causes of Imbibitional Chilling  

    Chilling EffectImbibitional chilling occurs during the process by which crops absorb water prior to germinating, a phase known as imbibition. Under optimal conditions, seeds should be planted when soil temperatures are above 55°F. When seeds are planted in soils below optimal temperature, the uptake of cold water can damage cells and cause seeds to rupture. This can lead seeds to become shriveled and cause seedlings to emerge late, in a corkscrew shape, or not at all.  

    If an injured seed eventually develops into an emerged seedling, it can become more vulnerable to disease or damage from herbicides. The risk of imbibitional chilling especially increases when soil temperatures fall below 50°F. Imbibitional chilling or cold injury can occur within 24 to 36 hours of planting, making the relationship between planting timing and soil temperature critical.  

    Preventing Chilling Injury 

    As the injury to seedlings occurs after planting, there is little preventive action that can be taken aside from planting when soil temperature is optimal. In the best case, if enough time is afforded between planting and the drop in soil temperature, a seed is less likely to undergo chilling if it is able to absorb warm water. There are ways to determine if imbibitional chilling has occurred after planting. When scouting, look for signs of inconsistent emergence. If a plant looks to be missing, dig into the soil around the area to see if a seedling can be found. If it has a corkscrew shape, underwent leaf emergence below ground, or is missing parts, these are also signs of imbibitional chilling. Delayed emergence of a seed can be the result of reduced seed vigor that can result from imbibitional chilling. 

    Soil temperatures should be monitored and averaged for the week preceding the projected planting date. To determine the soil temperature on the chosen planting day, take the temperature of the soil just after sunrise – the coldest part of the subsequent 24-hour period. Soil temperature changes more slowly than air temperature, but air temperature can still be a strong indicator for what to expect with soil temperature. If it is projected that soil temperature will remain above 50°F for 24 to 48 hours after planting, imbibitional chilling can be avoided.   

    Latham Seeds Agronomy Team

    April 1, 2019
    Agronomics, Corn, Crop, Emergence, Soybeans, Spring
  • Latham Hi‑Tech Seeds

    Rootless Corn Syndrome

    Rootless Corn Syndrome Photo Credit ISU
    Rootless Corn Syndrome Photo Credit ISU
    Credit: Iowa State University

    Rootless corn syndrome is a disorder, often a result of hot and dry soil surfaces and planting into dry soil. With rootless corn syndrome, the nodal roots will fail to attach to the soil. Nodal roots are essential conduits for transporting water and nutrients to corn plants. Their absence is highly consequential for the quality of stand and overall yield outcomes.  

    Dry soils warm more rapidly than moist soils, and combined with conventional tilling, corn plants can become susceptible to failed nodal root development. Heavy rainfall and planting when the soil is too wet can compact the soil, preventing nodal roots from extending downward.  

    The erosive effects of rainfall and wind combined with shallow planting depth are the primary drivers of rootless corn syndrome. In addition to weather-related causes, when corn is planted at a depth less than 1 inch below the surface, nodal root development can take place at a depth shallower than what is needed for having access to moist soil. Nodal roots should form between 1 to 1.5 inches below the surface.  

    What to Look for 

    Nodal roots first appear around the V1 and V2 stage. Rootless corn occurs in plants with poorly developed root systems and is usually observed in plants from about V3 to V8. When rootless corn syndrome is suspected, look for signs of lodged and collapsed corn plants. Corn plants may still be standing but later on they will lose vigor and fall over. Test plants in the area of concern by tugging on them to determine whether nodal roots are established and growing down.  

    Preventative Action 

    Rootless corn can largely be prevented by ensuring that seeds are planted at least 1.5 to 2 inches below the soil surface. For corn plants whose nodal roots fail to grow, the prospects for survival are bleak. Corn nutrient and water uptake hinges on having a developed nodal root system. For plants that do survive, poor stands and low vigor will be exhibited.  

    Moving soil to cover roots may allow them to recover – but if an operation is following a no-till plan, this may not be viable. Further, row cultivation for bringing soil around nodal roots will be ineffective if the soil below the surface lacks moisture for supporting recovery. Adequate rainfall and the absence of drought conditions will support optimal nodal root development and prevent rootless corn syndrome.   

    Latham Seeds Agronomy Team

    April 1, 2019
    Agronomics, Corn, Crop, Disease, Drought, Emergence
  • Latham Hi‑Tech Seeds

    Corn Rootworm

    ISU Southern Western Northern Rootworm L to R
    ISU Southern Western Northern Rootworm L to R
    Left to Right: Southern, Western and Northern Rootworm. (Credit: Iowa State University).

    Corn rootworm causes negative impacts for farmers every year. On average, corn rootworm costs farmers $1 billion annually, with costs equating to $800 million in lost yield and $200 million in treatment expenses.  

    The Western, Northern and Southern corn rootworms are three variations of this insect. They grow to be ¼ of an inch long when fully mature. The larvae appear white in color with a dark brown head. After mating in the late summer months, rootworm eggs overwinter and eventually hatch in May or June of the following year.  

    Rootworm Causes 

    Rootworms develop across four stages – egg, larvae, pupa and adult. The larvae feed on roots which leads to lodging and overall poor plant stand. Adult rootworms feed primarily on corn silks which can interfere with pollination, leading to lost yield.  

    ISU Corn Rootworm Larvae
    Rootworm Larvae (Credit: Iowa State University)

    The greatest impacts on yield and quality of stand are larvae feeding on the nodal roots. Mature rootworms tunnel throughout the root system and cause significant damage or death to corn plants. Root feeding and tunneling alone can lead to a loss in yield of up to 50 percent. 

    While rootworms primarily feed on corn, weeds are also a food source for larvae and mature beetles. Moist soil conditions with high organic matter content create favorable conditions for females to lay their eggs.  

    Scouting and Treatment Options  

    When scouting in the spring and early summer, dig up corn plants and check for damage on the root system.  Look for signs of tunneling or larvae actively feeding on roots. Placing the roots of a corn plant along with attached soil in water and waiting for larvae to float to the surface is another strategy to use. In the later stages of summer, watch for beetles feeding on corn ears and silks.  

    North Dakota State University found that complete loss or severe damage to a single root node can lead to a yield loss of 15 to 18 percent. Crop rotation is considered the best method for combatting continued infestation.  

    Below is a chart to help guide your insecticide application decision. 

    Rootworm Treatment Threshold


    We have Latham® hybrids equipped with resistance to rootworm have been deemed an effective method for staving off infestation. Contact your local Latham® representative to determine which hybrids will work best for combatting corn rootworm. 

    Latham Seeds Agronomy Team

    April 1, 2019
    Agronomics, Corn, Crop, Insects
  • Latham Hi‑Tech Seeds

    Armyworm 

    Latham Armyworm

    Latham ArmywormThe true armyworm – not to be confused with the fall armyworm – can pose a threat to corn stands and overall yield as an early season pest. Armyworm larvae are characterized by alternating light and dark bands.  

    The larvae feed primarily on seedling leaves and are associated with causing defoliation. When feeding, armyworms start at the base of the corn plant and work their way up, primarily feeding on softer leaves and during the nighttime. During the day, armyworms will migrate to the whorl of the corn plant as well as inside of soil cracks.  

    Cool and wet weather in the springtime supports the development of armyworms and fields with a heavy presence of weeds and grasses are conducive for allowing them to thrive. Armyworm moths migrate up from the south and look for the grassy fields or areas with lush vegetation. Therefore, winter rye cover crops have been associated with a higher prevalence of armyworm infestation. That is why it is important to terminate cover crops at least two weeks prior to corn planting.  

    Treatment and Mitigation  

    Death in corn plants from armyworm is not common, but if the armyworm feeds on a budding corn plant, this can lead to poor stands and significant loss in yield. When armyworm infestation causes defoliation in more than 25% of corn plants, it is advised to begin using an insecticide. Additionally, when armyworms are still developing and larvae is only ¼ to ¾ inches in length, treatment is considered economical and is advised.  

    Controlling excess grass growth will prevent moths from laying eggs and will offer protection from future infestation. If herbicides are applied, the loss of a weed habitat can drive armyworms to feed predominately on corn plants.  

    Treating an armyworm infestation with small corn plants requires quick decision making because large populations of armyworms can spread quickly across a field. Keep an eye on those fields that have a cover crop or are close to armyworm habitat. Be prepared to act if conditions warrant treatment!   

    Latham Seeds Agronomy Team

    April 1, 2019
    Agronomics, Corn, Crop, Insects
  • Latham Hi‑Tech Seeds

    Identifying and Controlling Cutworms

    Iowa State Black Cutworm

    Cutworms are insects that show up during the earliest growing stages of the season. The presence of cutworms can pose a threat to the well-being of corn plants, but their severity is highly variable and depends on the species. Delayed planting and corn plants shorter than 18 inches are most susceptible to undergoing severe damage from cutworms.  

    Iowa State Black Cutworm
    Black Cutworm
    Black Cutworm 

    Black cutworms are the most common species found in corn throughout the Midwest. The larvae of black cutworms can be up to 1¾ inches long with their appearance characterized by a dark-gray segmented body. Black cutworms are most likely to be seen between stages VE – when the shoot first emerges from the soil and V5 – when the first five leaves exhibit visible collars. The sets of paired spots unequal in size that run along the length of the black cutworm make it distinct in appearance. Black cutworms cause damage by chewing holes in leaves and larvae will cut the lower portions of the corn plant just above the soil line. The youngest larvae will feed on leaves whereas older cutworms will feed exclusively below ground level. The first generation of black cutworm will cause the most damage, though three to four generations can be produced in a year.  

     The black cutworm thrives best in wet and weedy fields with poor drainage. Cover cropping can make conditions conducive for the growth of laid eggs, especially if weeds are prevalent. Insecticide is advised if cutting is evident across 2-3% of corn plants and larvae do not exceed ¾ inch in length.  

    Purdue Dingy Cutworm
    Dingy Cutworm
    Dingy Cutworm 

    Similar to the black cutworm, dingy cutworms can form larvae up to 1¾ inches long and often emerge in fields with heavy crop residue. However, unlike black cutworms, the pairs of black dots running along the segmented back appear to be equal in size. When fully grown, dingy cutworms reach a size of one inch in length. Dingy cutworms typically only feed on leaves and do not cut plants.  

    Glassy, Bronzed and Sandhill Cutworms  
    UMN Glassy Cutworm
    Glassy Cutworm

    These three classes of cutworms are characterized predominately by the color of their larvae. Glassy cutworms have a white, translucent segmented body with a solid orange head and cause damage primarily to seedlings.

    Bronzed cutworms are colored with light orange, bronze and brown stripes running the length of their body. 

    Like glassy cutworms, sandhill cutworms have a translucent, light brown body that is uniform in color, including the head. Glassy cutworms are known to cause cutting damage in addition to chewing and feeding damage exhibited by other cutworms. 

    ISU Sandhill Cutworm Entomology Dept
    Sandhill Cutworm
    ISU Bronzed Cutworm Entomology Dept
    Bronzed Cutworm


    What to Look for When Scouting  

    Corn plants succeeding soybeans or legumes are most susceptible to hosting cutworms. With shorter corn plants having the greatest vulnerability to cutworm damage, scouting should begin once seedlings first emerge and continue until plants achieve a height of 18 inches tall. Look for signs of cutting, wilting and irregular holes on leaves. Uneven stand or inconsistencies in cutting across rows are also signs of cutworm damage.  

    Cutworms gravitate toward moist soil for burrowing. When looking for signs of infestation, dig around the base of plants to look for burrows ranging in size from three to four inches. When soil is dry, dig deeper to three inches below ground to identify burrows. 

    Treatment 

    As cutworms are associated with reduced stand resulting from cutting or wilting, yield can subsequently be decreased. However, replanting is not usually necessary and is only advised if the presence of cutworms is not under control and stand has been severely impacted. 

    Controlling weeds can reduce overwintering and can remove an environment favorable for hosting cutworms. Tilling practices that reduce weeds and field residue will deter moths looking to lay eggs in the fall. Reduced tillage or no-till, delayed planting and overwintering cover crops are all management practices that increase chances of cutworm damage. If you see cutworm damage on 2-3% of plants and they are smaller than ¾ inch, it’s time to spray. When pre-applying insecticides to dry or crusted soils, it is advised to work the treatment into the soil so it is able to reach cutworms and burrows housed below ground.  

    Photo Credits 

    Black Cutworm: Iowa State University Extension and Outreach 

    Dingy Cutworm: Purdue University 

    Glassy Cutworm: University of Minnesota Extension  

    Sandhill Cutworm: Iowa State University Department of Entomology 

    Bronzed Cutworm: Iowa State University Department of Entomology 

    Latham Seeds Agronomy Team

    April 1, 2019
    Agronomics, Corn, Crop, General, Insects
  • Latham Hi‑Tech Seeds

    Spring Frost Damage in Corn and Soybeans 

    IMG 0392

    Frost damage occurs in corn and soybeans when plants are exposed to freezing or below-freezing temperatures. Damage can occur to the plants above and below the soil when temperatures range from 28 to 32°F and colder. Corn and soybean plants exposed to air temperatures below 28°F are often lethal and prevent plants from undergoing full recovery from injuries. The key in assessing frost damage is waiting five days to allow for any potential growth recovery or rehabilitation to occur. 

    IMG 0392Spring Frost in Soybeans  

    If frost damage occurs below the soybeans’ cotyledons – the first leaves that emerge above ground – the plant will mostly likely fail to recover. Wilted and dried leaves will often remain on the plant after a frost event. In recovering soybeans, new leaves will emerge at the site of cotyledons – the first pair of embryonic leaves that appear above ground. If auxiliary buds growing at the juncture of the plant’s stem and cotyledons are not frozen, the plant is on track for recovery.  

    IMG 0393Spring Frost in Corn 

    Since corn plants are protected by soil for a longer period of time relative to soybeans, they are less susceptible to lethal frost injury. However, temperatures below 28°F can cause damage below the soil and compromise growth, leading to poor stands. Once the growing point is above ground, corn plants exposed to 32°F for a few hours and 28°F for a few minutes can be lethal. After an initial frost, continued cool temperatures can decrease yield due to the onset of stalk rot diseases.  

    If frost occurs before V6, yield loss is minimal. In recovering corn plants, you should see new leaf growth emerging from whorls. Yellow-colored tissue that exists above the growing point is a sign of regeneration.  

    Latham Seeds Agronomy Team

    April 1, 2019
    Agronomics, Corn, Crop, Frost, Soybeans, Weather
Previous Page
1 … 17 18 19 20 21 … 36
Next Page

Latham Hi‑Tech Seeds

131 180th Street | Alexander, IA 50420

(641) 692-3258

SIGNUP FOR OUR NEWSLETTER
  • Contact
  • Legal
  • Dealer Center
  • Seedware Login
  • Latham Gear

© 2025 Latham Hi‑Tech Seeds. All rights reserved. | Iowa Web Design by Webspec | Privacy Policy

Latham® Hi-Tech Seeds is a trademark of M.S. Technologies, L.L.C., 103 Avenue D, West Point, IA 52656.