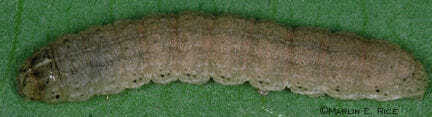
The true armyworm – not to be confused with the fall armyworm – can pose a threat to corn stands and overall yield as an early season pest. Armyworm larvae are characterized by alternating light and dark bands.
The larvae feed primarily on seedling leaves and are associated with causing defoliation. When feeding, armyworms start at the base of the corn plant and work their way up, primarily feeding on softer leaves and during the nighttime. During the day, armyworms will migrate to the whorlof the corn plant as well as inside of soil cracks.
Cool and wet weather in the springtime supports the development of armyworms and fields with a heavy presence of weeds and grasses are conducive for allowing them to thrive. Armyworm moths migrate up from the south and look for the grassy fields or areas with lush vegetation. Therefore, winter rye cover crops have been associated with a higher prevalence of armyworm infestation.That is why it is important to terminate cover crops at least two weeks prior to corn planting.
Treatment and Mitigation
Death in corn plants from armyworm is not common, but if the armyworm feeds on a budding corn plant, this can lead to poor stands and significant loss in yield. When armyworm infestation causes defoliation in more than 25% of corn plants, it is advised to begin using an insecticide. Additionally, when armyworms are still developing and larvae is only ¼ to ¾ inches in length, treatment is considered economical and is advised.
Controlling excess grass growth will prevent moths from laying eggs and will offer protection from future infestation. If herbicides are applied, the loss of a weed habitat can drive armyworms to feed predominately on corn plants.
Treating an armyworm infestation with small corn plants requires quick decision making because large populations of armyworms can spread quickly across a field. Keep an eye on those fields that have a cover crop or are close to armyworm habitat. Be prepared to act if conditions warrant treatment!
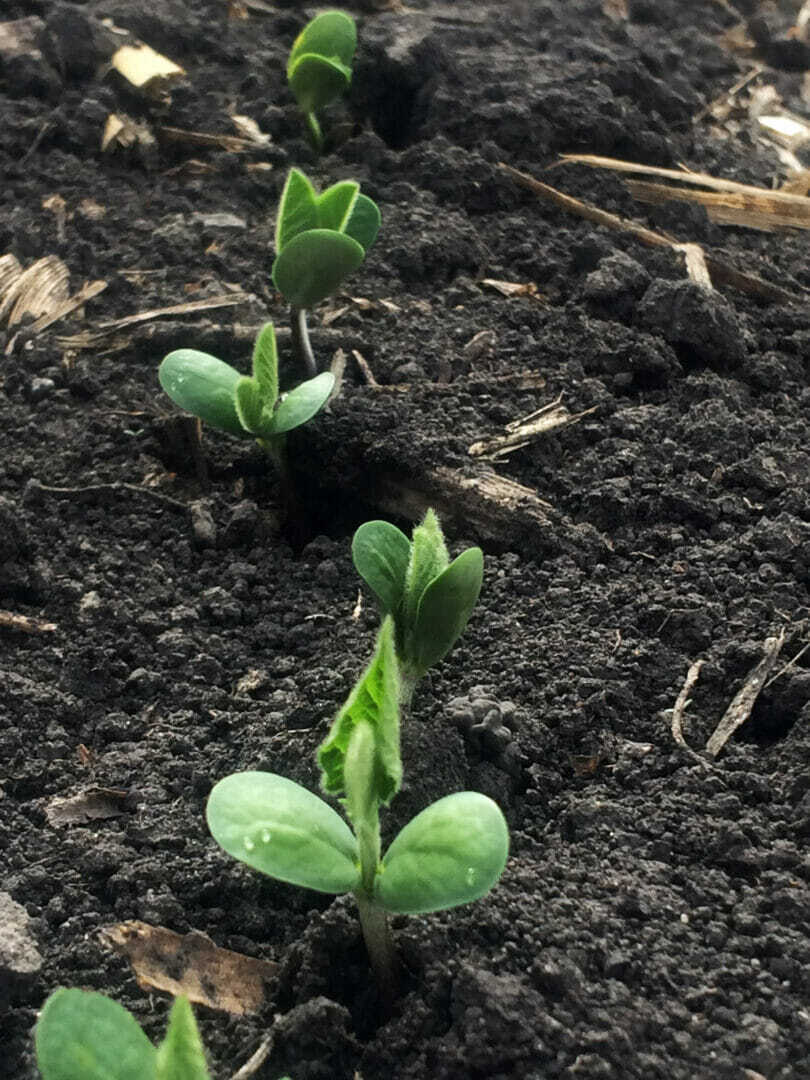
Many of our minds are already on the upcoming planting season. This week someone posed the following question, “How hard of a frost can soybeans withstand?”
It’s a great question, so I wanted to address the topic of early planting a bit, well, “earlier” than usual!
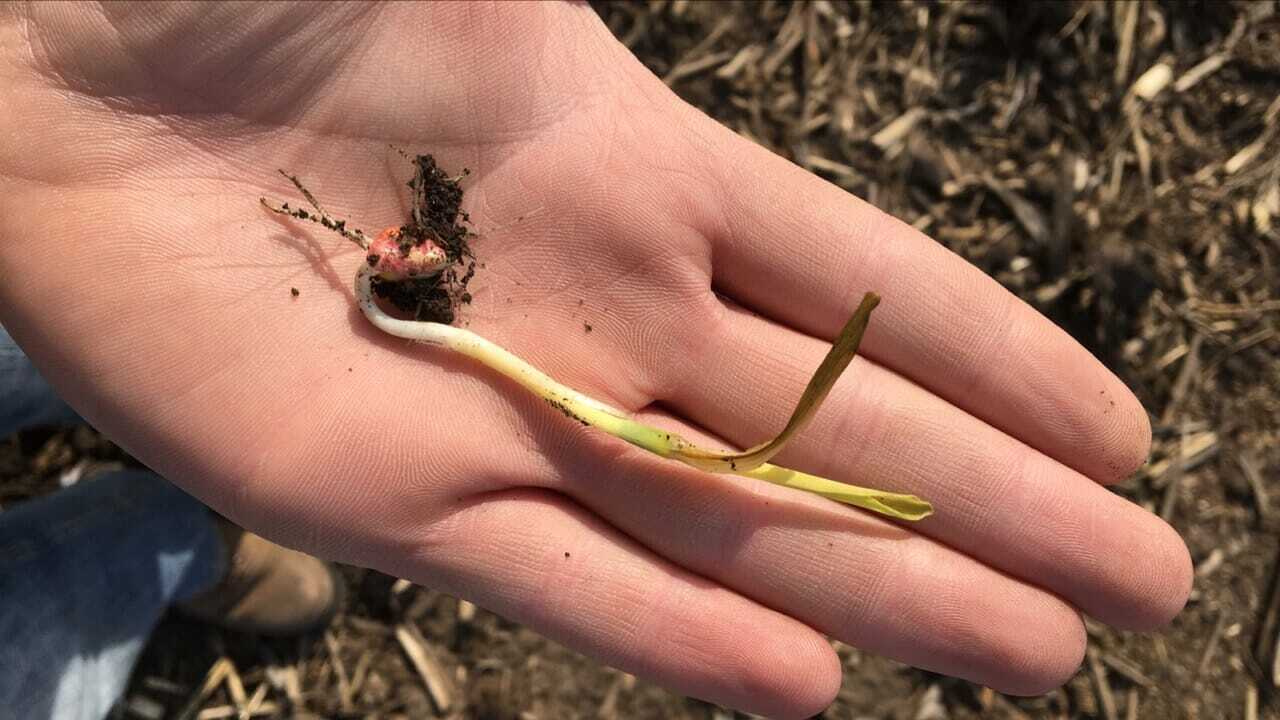
The first thing to keep in mind is that cold temperatures at or before planting can negatively affect the growing point of the plant. For corn, that growing point stays under the soil surface until the V5-V6 stage, helping protect the plant to a certain degree from colder weather spells for several weeks. For soybeans, however, the growing point comes out of the ground at emergence. Therefore, a soybean seedling is immediately vulnerable to cold weather.
Using a fungicide seed treatment will help protect young soybeans from seedling diseases at this early stage, but they are not designed to protect against cold temperatures. Soybeans typically require over 100 growing degree units (GDU’s) to accumulate before emergence, which is similar to corn that requires about 125 GDU’s. Abiding by the minimum soil temperature of 50 degrees Fahrenheit will keep you away from poor emergence and the seedling disease risk associated with soil temps below 50 degrees. That’s why I suggest watching the weather forecasts before you plant soybean seed, and do your best to ensure hard frosts (which take place at 28 degrees Fahrenheit) are no longer possible.
Remember, when soybeans emerge, they have a growing point at the base of each cotyledon and at the main shoot. The main shoot is the small leaves in-between the cotyledons. If you notice brown on the stem below the cotyledons, the plant will not recover. Early planting is proven to provide higher yields, but it is is fine balance between the two, so watch weather forecasts and soil temperatures so you can find the balance on your own farm.
Additional tips to keep in mind before planting:
Grab a clump of soil and watch how easily it crumbles. If it stays in a ball, conditions are NOT right for planting. If it crumbles easily, the soil is fit for planting.
Make sure your planting date is covered in your farm insurance policy – this includes your “do not plant before” dates. If you plant outside those dates, your insurance could be jeopardized.
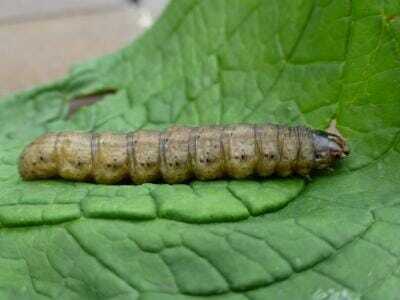
Cutworms are insects that show up during the earliest growing stages of the season. The presence of cutworms can pose a threat to the well-being of corn plants, but their severity is highly variableand depends on the species. Delayed planting and corn plants shorter than 18 inches are most susceptible to undergoing severe damage from cutworms.
Black Cutworm
Black Cutworm
Black cutworms are the most common species found in corn throughout the Midwest. The larvae of black cutworms can be up to 1¾ inches long with their appearance characterized by a dark-gray segmented body. Black cutworms are most likely to be seen between stages VE – when the shoot first emerges from the soil and V5 – when the first five leaves exhibit visible collars. The sets of paired spots unequal in size that run along the length of the black cutworm make it distinct in appearance. Black cutworms cause damage by chewing holes in leaves and larvae will cut the lower portions of the corn plant just above the soil line. The youngest larvae will feed on leaves whereas older cutworms will feed exclusively below ground level. The first generation of black cutworm will cause the most damage, though three to four generations can be produced in a year.
The black cutworm thrives best in wet and weedy fields with poor drainage. Cover cropping can make conditions conducive for the growth of laid eggs, especially if weeds are prevalent. Insecticide is advised if cutting is evident across 2-3% of corn plantsand larvae do not exceed ¾ inch in length.
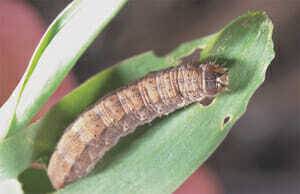
Dingy Cutworm
Dingy Cutworm
Similar to the black cutworm, dingy cutworms can form larvae up to 1¾ inches long and often emerge in fields with heavy crop residue. However, unlike black cutworms, the pairs of black dots running along the segmented back appear to be equal in size. When fully grown, dingy cutworms reach a size of one inch in length. Dingy cutworms typically only feed on leaves and do not cut plants.
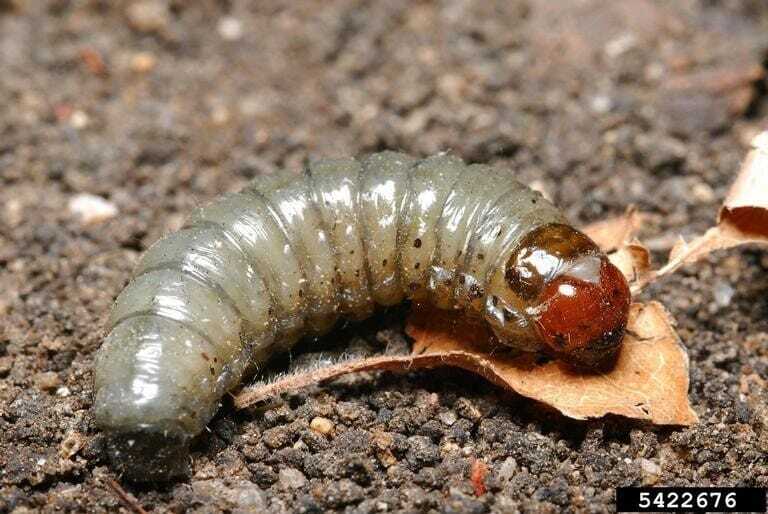
Glassy, Bronzed and Sandhill Cutworms
Glassy Cutworm
These three classes of cutworms are characterized predominately by the color of their larvae. Glassy cutworms have a white, translucent segmented body with a solid orange head and cause damage primarily to seedlings.
Bronzed cutworms are colored with light orange, bronze and brown stripes running the length of their body.
Like glassy cutworms, sandhill cutworms have a translucent, light brown body that is uniform in color, including the head. Glassy cutworms are known to cause cutting damage in addition to chewing and feeding damage exhibited by other cutworms.
Sandhill CutwormBronzed Cutworm
What to Look for When Scouting
Corn plants succeeding soybeans or legumes are most susceptible to hosting cutworms. With shorter corn plants having the greatest vulnerability to cutworm damage, scouting should begin once seedlings first emerge and continue until plants achieve a height of 18 inches tall. Look for signs of cutting, wilting and irregular holes on leaves. Uneven stand or inconsistencies in cutting across rows are also signs of cutworm damage.
Cutworms gravitate toward moist soil for burrowing. When looking for signs of infestation, dig around the base of plants to look for burrows ranging in size from three to four inches. When soil is dry, digdeeper to three inches below ground to identify burrows.
Treatment
As cutworms are associated with reduced stand resulting from cutting or wilting, yield can subsequently be decreased. However, replanting is not usually necessary and is only advised if the presence of cutworms is not under control and stand has been severely impacted.
Controlling weeds can reduce overwintering and can remove an environment favorable for hosting cutworms. Tilling practices that reduce weeds and field residue will deter moths looking to lay eggs in the fall. Reduced tillage or no-till, delayed planting and overwintering cover crops are all management practices that increase chances of cutworm damage.If you see cutworm damage on 2-3% of plants and they are smaller than ¾ inch, it’s time to spray. When pre-applying insecticides to dry or crusted soils, it is advised to work the treatment into the soil so it is able to reach cutworms and burrows housed below ground.
Photo Credits
Black Cutworm: Iowa State University Extension and Outreach
Dingy Cutworm: Purdue University
Glassy Cutworm: University of Minnesota Extension
Sandhill Cutworm: Iowa State University Department of Entomology
Bronzed Cutworm: Iowa State University Department of Entomology
Frost damage occurs in corn and soybeans when plants are exposed to freezing or below-freezing temperatures. Damage can occur to the plants above and below the soil when temperatures range from 28 to 32°F and colder. Corn and soybean plants exposed to air temperatures below 28°F are often lethal and prevent plants from undergoing full recovery from injuries.The key in assessing frost damage is waiting five days to allow for any potential growth recovery or rehabilitation to occur.
Spring Frost in Soybeans
If frost damage occurs below the soybeans’ cotyledons – the first leaves that emerge above ground – the plant will mostly likely fail to recover. Wilted and dried leaves will often remain on the plant after a frost event. In recovering soybeans, new leaves will emerge at the site of cotyledons – the first pair of embryonic leaves that appear above ground. If auxiliary buds growing at the juncture of the plant’s stem and cotyledons are not frozen, the plant is on track for recovery.
Spring Frost in Corn
Since corn plants are protected by soil for a longer period of time relative to soybeans, they are less susceptible to lethal frost injury. However, temperatures below 28°F can cause damage below the soil and compromise growth, leading to poor stands. Once the growing point is above ground, corn plants exposed to 32°F for a few hours and 28°F for a few minutes can be lethal. After an initial frost, continued cool temperatures can decrease yield due to the onset of stalk rot diseases.
If frost occurs before V6, yield loss is minimal. In recovering corn plants, you should see new leaf growth emerging from whorls. Yellow-colored tissue that exists above the growing point is a sign of regeneration.
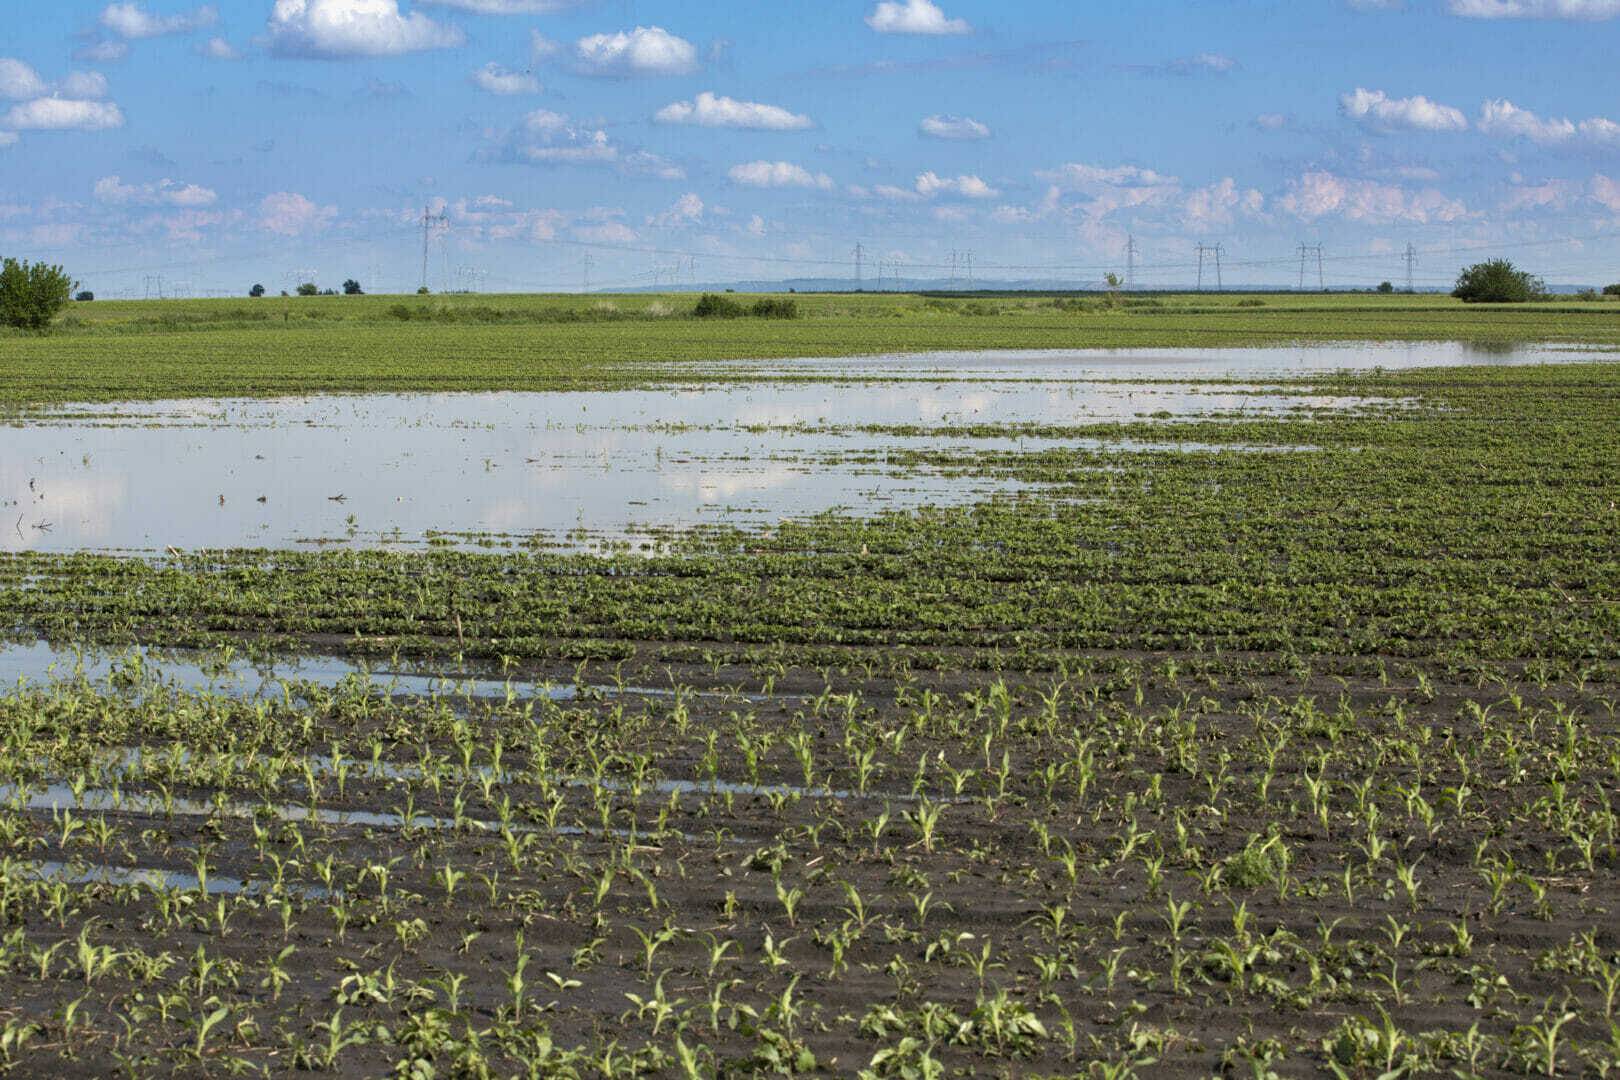
For corn and soybean plants before and after emergence, flooding and saturated soils can jeopardize yield. Germinating seedsrequire oxygen to survive. After the first 48 hours following a heavy rain or flooding event, oxygen levels in the soil will become entirely depleted and prevent seedsfrom germinating and continuing to grow.
Yield loss for corn and soybeans depends on the duration of the flooding event and at what growth stage it occurs. The longer a plantis submerged or growingin saturated soil, the less likely it is to survive. Generally, smaller seedlings with lower stamina are less likely to survive following a heavy rainfall event compared to larger seedlings.
Warmer temperatures are associated with higher growth rates, and as a result, a higher amount of oxygen is used. When temperatures exceed the mid-70° range, survival may not exceed 24 hours following the heavy rainfall event.
Effects on Corn Plants
Before V6, the growing point is below ground and damage from flooding ismore likely to impact yield or kill the plant. After V6, corn plants fair better in saturated conditions if some of the plant is out of the water. However, the higher temperatures can speed up respiration and oxygen requirements, leading to more plant damage compared to cooler temperatures during a flood event.
Nitrogen loss is another way flooding impacts corn yields. Corn consumes two-thirds of its nitrogen by the start of the reproductive stage and relies on a functional root system. If a flooding event compromises plant roots, yield can be reduced significantly. Research from Iowa State University found that a 30-inch corn plant that had been flooded for 48 hours with minimal nitrogen uptake experienced a 20% reduction in yield. Flooding can also promote seed decay, crazy top that exhibits proliferated tassels, stunted ears or completely barren plants
Impacts on Soybeans
For soybean plants at stages V2 or V3, survival is possible. However, nitrogen fixation can be restricted and reduced yield is still likely. For soybeans submerged for less than 48 hours, yield loss is rarely observed.
Once the first bloom appears at stage R1 the number of pods per node will be greatly decreased if sitting in saturated conditions. Wilting, stunting and yellow-leaves will be expressed in damaged or dying soybean plants. Further, research has found that greater yield reduction has been observed in soybean plants grown in heavy clay soils as opposed to silt loam soils.
Assessing Outcomes
Flooding and prolonged saturated soils pose the greatest threat to young plants that have yet to emerge above ground. As water recedes, any remaining residual mud on corn and soybean plants can reduce photosynthesis. For plants that survive a flooding event, they will be more vulnerable to diseases and stresses over the course of the growing season.
The survival outlook for saturated seeds and germinating plants will not exceed four days. Plants that surviveafter water levels recede will continue to grow within three to five days.
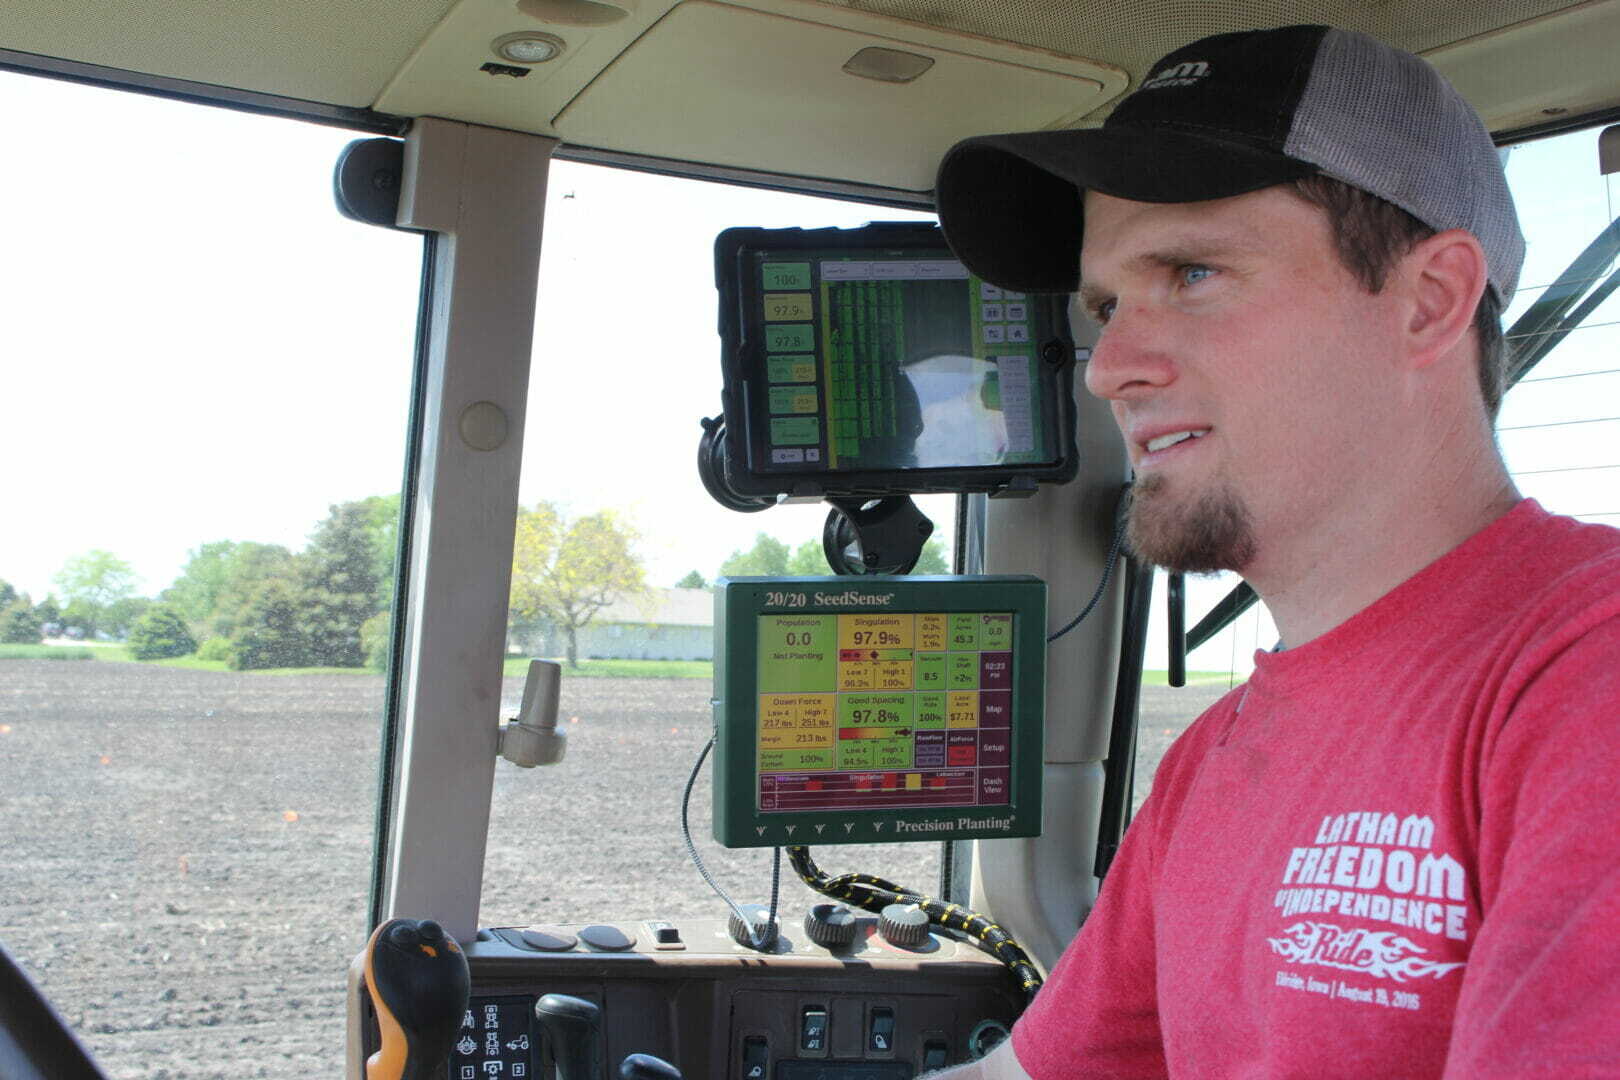
Win-Win: Precision Ag Technology Increases Farm Efficiency and Yield
Most U.S. farmers use some form of precision ag technology, and the majority of these farmers are looking for ways to use their data more efficiently. Organizing data and offering suggestions on how farmers can increase yield on a field-by-field basis is where Seed-2-Soil® services comes into play.
Technology in the tractor is one part of precision ag data that is recorded by the combine, planter or sprayer monitor requires another level of understanding. Here at Latham Hi‑Tech Seeds, we’re working to help farmers find the intersection between crop production and precision ag.
We believe this technology is a huge stepping stone in terms of efficiency and reaching that next level of production on your fields. Understanding the variability on each of your farms is Step One.
Our FieldXField process focuses on placing hybrids/varieties according to yield-limiting factors combined with data from your yield monitor. We can define smaller “management or productivity zones” that will allow you to put Variable Rate (VR) technology to use on your farm.
Combining data such as soil samples, satellite or drone imagery, disease and insect scouting reports, and planter and sprayer applications gives you a much clearer picture of each field. Armed with this additional data, you can monitor and manage that field throughout the season.
There are many ways to incorporate precision ag technology on your farm. While not everyone will have every technology, using a few tools provides valuable information. For example, variable rate (VR) hybrid planting can provide a $20/acre benefit. We’re testing this technology on a farm in Northwest Iowa and are eager to see the results this fall.
Although most farmers don’t yet have the capability for VR hybrid planting, many have the ability to apply VR fertilizers. Studies show a $5-8/acre benefit from decreasing over application and under application to areas within a field. If your fields have a large amount of variability, you may reap even more revenue from VR technologies.
Variable rate seeding and applications are just one piece of the precision ag pie. We can work with you to make your data work for you and your operation. It’s our goal to work with farmers and add value regardless of where they are along the technology adoption spectrum.
One simple, but especially important detail, is naming your fields consistently from year to year. Also make sure your monitors and GPS receivers are communicating with one other. You may see a yield number on your monitor, but that doesn’t mean the GPS location and other information is running through your combine. The data coming out is only as good as the information going in! Calibration is key to getting useful results.
I’m looking forward to working with Latham dealers and customers to help bring more value from the combined use of seed and precision ag technologies. Feel free to contact me at 1.877.GO.LATHAM (1.877.465.2842) if you’d like to visit about how precision ag can benefit your operation!
Did you know seed placement can affect up to 20% of your final yield? Today Phil Long discusses the WHY behind FieldxField™. Tune in to learn more! #AskTheAgronomist
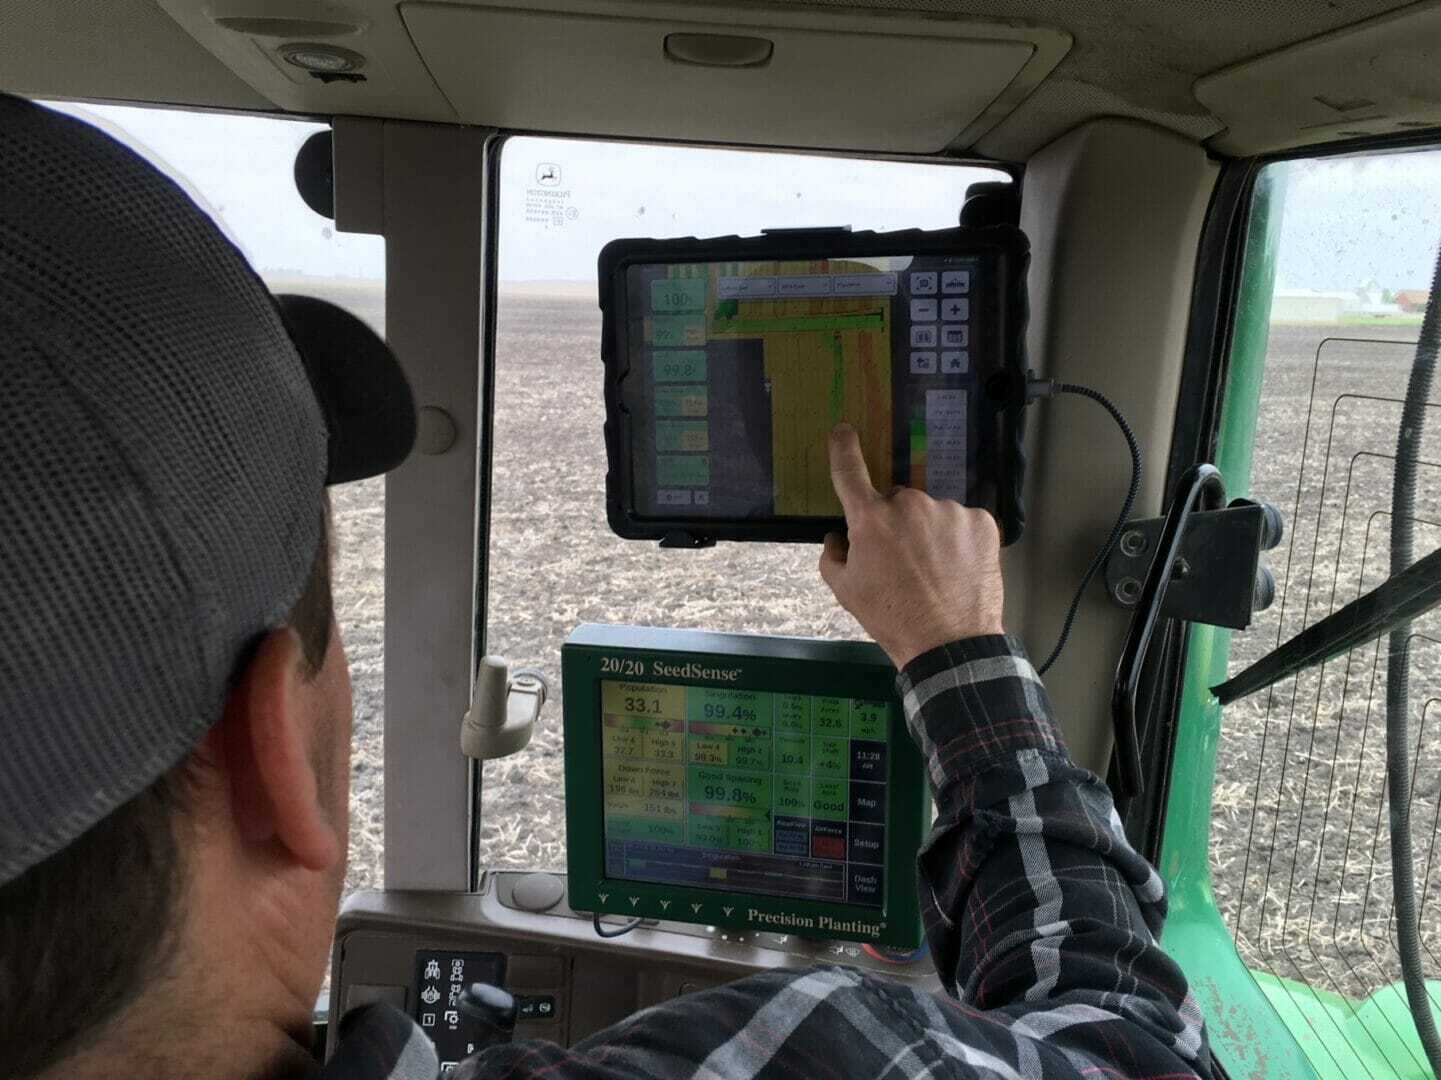
Update Precision Technology before Planting Begins
Spring officially arrives March 20, so farmers are busy readying equipment.
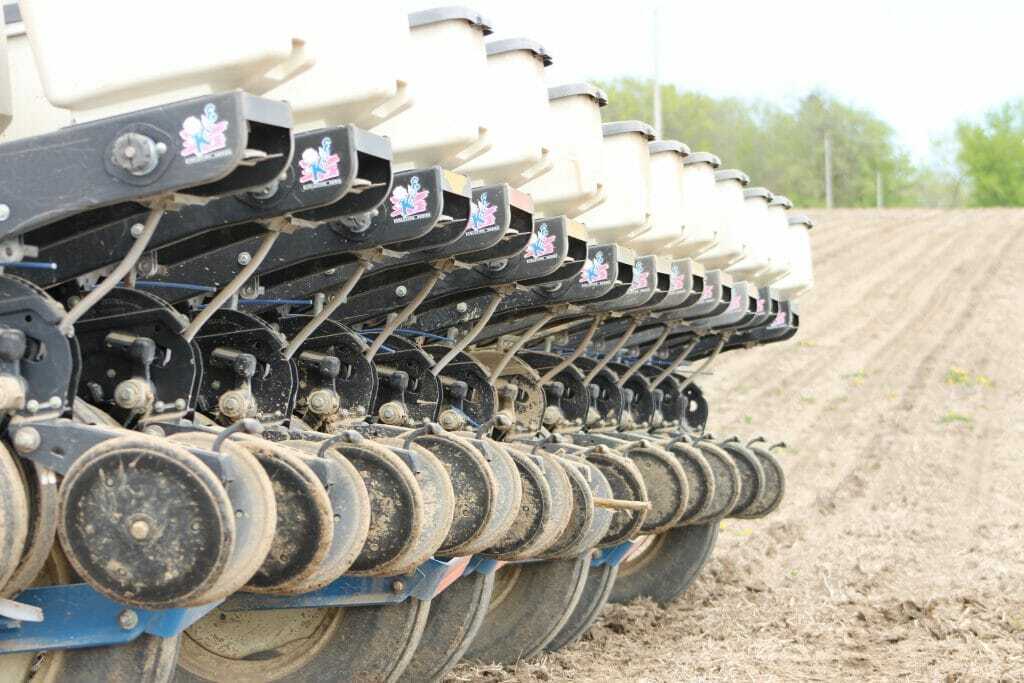
Many yield variables are determined at the planter: planting date, seeding rate, planting depth, planting conditions, where to place fertilizer, and especially planting precision (singulation/spacing). Many pieces of the puzzle must come together to give your corn and soybeans a good start, but I’m going to focus on the precision part of planter preparation.
Most farmers begin by thoroughly checking their planter by running units on a test stand. Test all bearings, chains (if applicable), hoses, motors, openers, rows cleaners, etc. to ensure they will last through the planting season. You don’t want to have a needless breakdown because worn parts weren’t replaced.
Another critically important part of planter preparation is your technology. Make sure all monitor software is current. If it isn’t, this can cause problems with how well it communicates with your planter. Old software can cause functions to glitch or simply fail to work, which is very frustrating in the heat of the battle. Outdated software also may impact how your auto-steer functions. Have your dealer check your monitor for updates because that’s one tool that can reduce operator fatigue during long days during planting season.
Also be sure that field names have been entered, so you can collect data specific to each hybrid or variety. This is pretty simple to do if you’re using Climate FieldView™ as it will prompt you to enter a hybrid once you confirm the field you’re in, or you can pre-load hybrid numbers by field to save time searching or entering them on the go.
If you’re running an OEM monitor in the cab, the biggest challenges are getting to the correct screen on your monitor and then entering the hybrid in the correct box. Some monitors are harder to navigate than others, but this step is important for recording yield data and better managing your operation. A few seconds of work can provide you with “data in hand” come next winter when you’re evaluating products.
“Setup files” for the monitor are really helpful to preload information like hybrids, client-farm-field structure, as well as GPS boundaries for row shut-offs. These files can be loaded into most monitors by creating a setup file in a software program and then transferring it to the monitor by USB stick. This is very helpful for pre-loading hybrid/variety names because they will be available in a drop-down menu, which makes it easy for you to select them. Ask your dealer if your monitor is capable of reading setup files.
One more tip is to print a list of your fields and field names, so you can keep a copy in the tractor cab. If more than one person operates your planter – or if you run more than one planter – then everyone will know which hybrid to plant in each field. Clarification helps save precious time.
If you have any questions, call me at 877-GO-LATHAM (877-465-2842) or email me at phill@lathamseeds.com. You can even ask questions in real time as agronomic information, including precision planting tips, are shared each Thursday during Latham’s Facebook Live broadcast. Check out the videos we post weekly on Facebook. You also can watch archived videos on LathamSeeds.com under “The Field Position” or search our Facebook page for #AsktheAgronomist.

 The true armyworm – not to be confused with the fall armyworm – can pose a threat to corn stands and overall yield as an early season pest. Armyworm larvae are characterized by alternating light and dark bands.